异常过滤器
Nest 有个内置的异常处理层,异常过滤器(exception filters) 的定位是用于处理未手动捕获的异常。
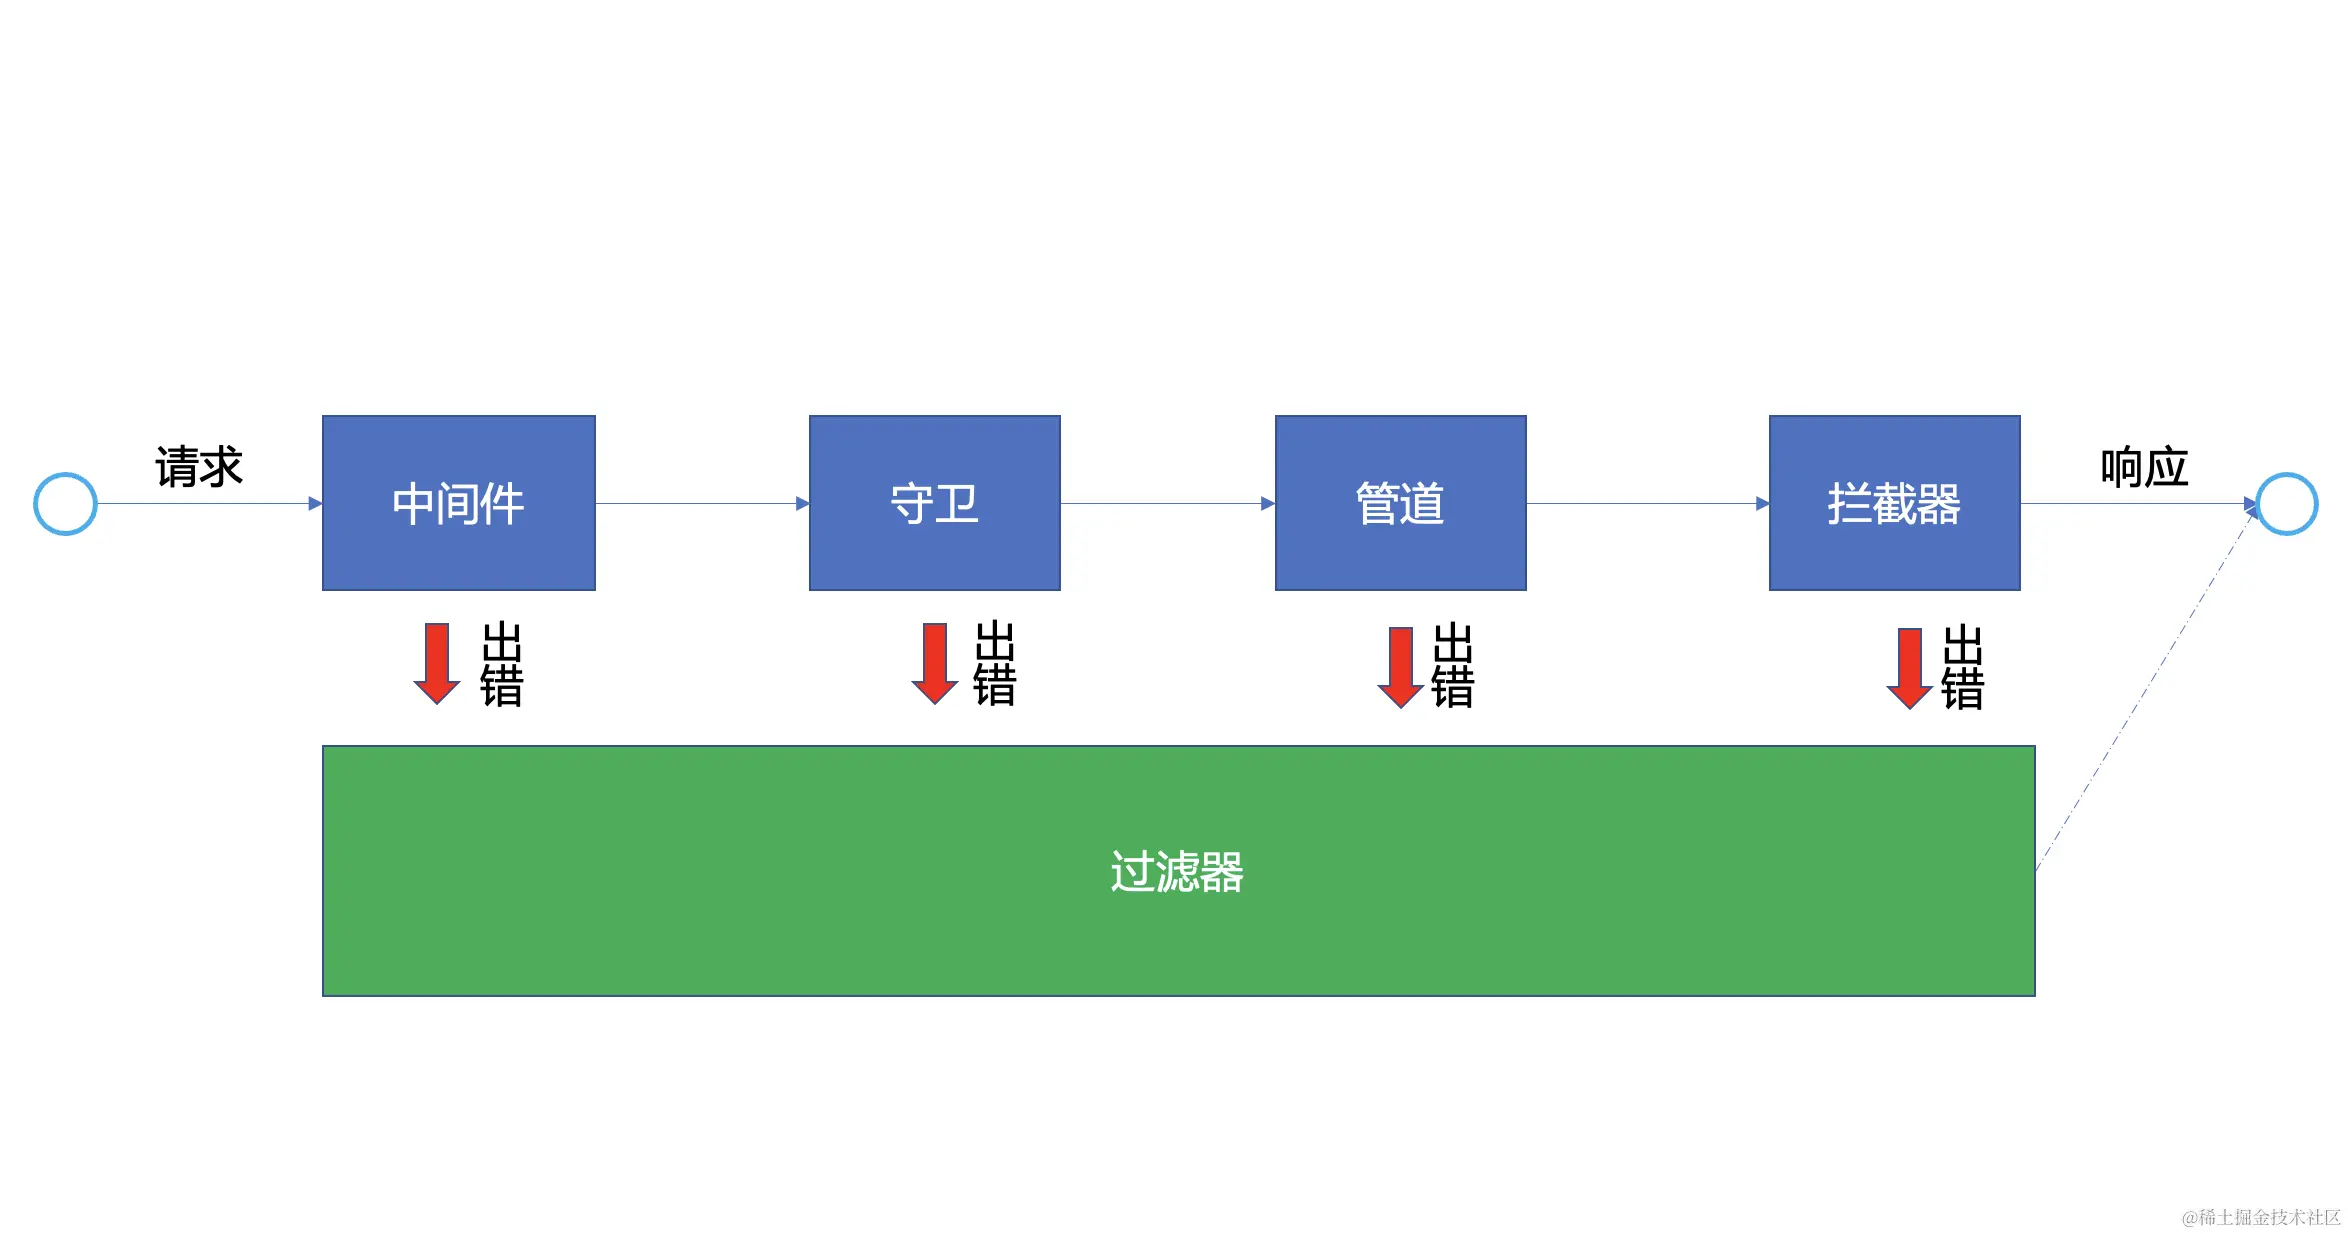
在服务端处理的过程中,很多时候都需要抛出异常,而这种异常是不能乱抛的,往往需要真实准确的异常错误信息反馈给前端。
内置 HTTP 异常
Nest 提供一组继承自基类 HttpException 的标准异常,代表许多最常见的 HTTP 异常。
BadRequestExceptionUnauthorizedExceptionNotFoundExceptionForbiddenExceptionNotAcceptableExceptionRequestTimeoutExceptionConflictExceptionGoneExceptionHttpVersionNotSupportedExceptionPayloadTooLargeExceptionUnsupportedMediaTypeExceptionUnprocessableEntityExceptionInternalServerErrorExceptionNotImplementedExceptionImATeapotExceptionMethodNotAllowedExceptionBadGatewayExceptionServiceUnavailableExceptionGatewayTimeoutExceptionPreconditionFailedException
内置异常还可以使用 options 参数提供错误信息和错误码:
throw new BadRequestException('Something bad happened', { cause: new Error(), description: 'Some error description' })响应将如下所示:
{
  "message": "Something bad happened",
  "error": "Some error description",
  "statusCode": 400,
}抛出异常
只要我们在程序中抛出错误时,就会被异常层捕获并响应给客户端:
@Controller("cats")
export class CatsController {
  constructor(private readonly catsService: CatsService) {}

  @Get()
  getHello(): string {
    throw new HttpException(
      {
        message: "请求错误",
        error: true,
        statusCode: HttpStatus.BAD_REQUEST
      },
      HttpStatus.BAD_REQUEST
    );
  }
}访问 / ,客户端会接收到抛出的异常:

自定义异常
大部分情况下,Nest 内置的异常类已经覆盖 HTTP 请求大部分的场景。如果确实需要创建自定义异常,这个异常类需要继承基类 HttpException 类,Nest 将会识别我们抛出的异常。
import { HttpException } from "@nestjs/common";
import { HttpExceptionOptions } from "@nestjs/common/exceptions/http.exception";

export class ParamException extends HttpException {
  constructor(response: string | Record<string, any>, status: number, options?: HttpExceptionOptions) {
    super(response, status, options);
  }
}

// 抛出自定义异常
@Get()
getHello(): string {
  throw new ParamException(
    {
      message: "参数错误",
      error: true,
      statusCode: HttpStatus.BAD_REQUEST
    },
    HttpStatus.BAD_REQUEST
  );
}但是在实际开发处理中,服务端一般不会抛 HTTP 异常给客户端。
一般的做法是遵循 RESTFul 风格,返回给前端 HttpCode: 200,并约定业务使用的 errorcode 编码,抛出通用的业务错误。前端根据约定的编码,给予用户对应的错误提示。
基于这种场景,我们需要对错误信息进行过滤,在任何非预期的业务错误场景下,只需要抛出这个异常即可。
业务错误码
错误码设计如下:
- 业务错误码由 10 位纯数字组成。
- 业务错误码格式:
4030000001 - 错误码说明
| 1-3位 | 4-5位 | 6-8位 | 9-10位 |
|---|---|---|---|
| 403 | 00 | 00 | 001 |
| HTTP状态码 | 服务编号,单体服务为00 | 模块编码 | 业务错误编码,001表示未登录 |
以下是个人习惯封装的样子:
interface HttpError{
  message: string; // 错误详细描述
  error_code: number; // 业务错误编码
  code: string; // 业务错误枚举key
  path: stirng;
}我们还需要实现异常过滤器,负责捕获 HttpException 类实例的异常,并为它们实现自定义响应逻辑。
异常过滤器类需要实现 ExceptionFilter 接口,@Catch() 装饰器则是告诉 Nest 在发生异常时,需要过滤的类型为 ParamException (如果为空,默认过滤全部异常类型,但是多数情况下,默认需要过滤全部情况),我们可以一次传递多个异常类型。
@Catch(ParamException)
export class HttpExceptionFilter implements ExceptionFilter {
  catch(exception: any, host: ArgumentsHost): any {
    console.log(exception);
    console.log(host);
  }
}参数ArgumentsHost
可以发现,请求工具(postman)处于一直挂起,这是因为我们在过滤器中未返回RequestObject 内容,!!这会导致客户端一直挂起。
ArgumentsHost 参数则可以获取适当的上下文对象(底层依赖的框架 Express 或其他适配器), RequestObject可以从中获取,接着我们只要返回内容,即可解除请求挂起的问题。
控制器抛出错误,由过滤器过滤之后,再返还给客户端:
展开查看异常枚举
// 异常枚举
class ErrorCode {
  readonly #code: number;
  readonly #msg: string;
  readonly #errorCode: string;
  constructor(code: number, errorCode: string, msg: string) {
    this.#code = code;
    this.#msg = msg;
    this.#errorCode = errorCode;
  }

  get msg() {
    return this.#msg;
  }

  get code() {
    return this.#code;
  }
  get errorCode() {
    return this.#errorCode;
  }
}
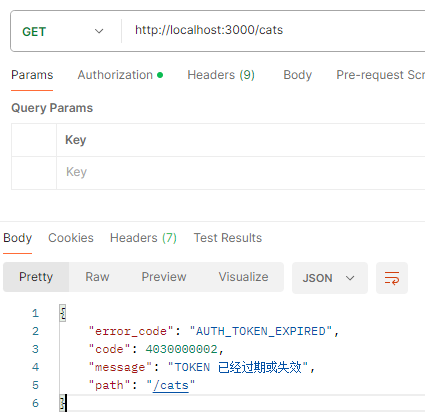
export const AUTH_TOKEN_EXPIRED = new ErrorCode(4030000002, "AUTH_TOKEN_EXPIRED", "TOKEN 已经过期或失效");// cats.controller.ts
@Get()
getHello(@Query("id") id: string): string {
if (!id) {
throw new HttpException(
{
error_code: AUTH_TOKEN_EXPIRED.errorCode,
code: AUTH_TOKEN_EXPIRED.code,
message: AUTH_TOKEN_EXPIRED.msg
},
HttpStatus.FORBIDDEN
);
} else {
return "Hello World! " + id;
}
}完善参数不全的异常过滤器并响应给客户端:
@Catch()
export class HttpExceptionFilter implements ExceptionFilter {
  catch(exception: HttpException, host: ArgumentsHost): any {
    // 取得上下文
    const ctx = host.switchToHttp();
    // 响应对象
    const response = ctx.getResponse<Response>();
    // 请求对象
    const request = ctx.getRequest<Request>();
    // 错误对象
    const reason = exception.getResponse() as object;

    console.log("reason", reason);

    response.send({
      ...reason,
      path: request.url
    });
  }
}
绑定位置
过滤器绑定的位置分为模块、全局。
模块注册:
- 绑定在路由方法之上。
- 绑定在控制器上。
// 2.绑定整个控制器
@UseFilters(HttpExceptionFilter)
@Controller("cats")
export class CatsController {
  constructor(private readonly catsService: CatsService) {}

  // 1.绑定在路由方法上
  @UseFilters(HttpExceptionFilter)
  @Get()
  getHello(@Query("id") id: string): string {
    if (!id) {
      throw new HttpException(
        {
          error_code: AUTH_TOKEN_EXPIRED.errorCode,
          code: AUTH_TOKEN_EXPIRED.code,
          message: AUTH_TOKEN_EXPIRED.msg
        },
        HttpStatus.FORBIDDEN
      );
    } else {
      return "Hello World! " + id;
    }
  }
}全局注册:
- 在
main中通过app.useGlobalFilter注册全局过滤器。 - 通过依赖注入的形式注册过滤器。
app.useGlobalFilter(HttpExceptionFilter)依赖注入
依赖注入
app.useGlobalFilter 的方式无法使用依赖注入的服务。我们可以在模块中使用依赖注入的方式,这样我们的自定义管道也能使用依赖服务做一些事情。比如在管道中查询数据库,判断是否存在该用户的id。学习更多依赖注入点击这里。
import { Module } from '@nestjs/common';
import { APP_FILTER } from '@nestjs/core';

@Module({
  providers: [
    {
      provide: APP_FILTER,
      useClass: HttpExceptionFilter,
    },
    AppService
  ],
})

export class AppModule {}这样注册后,在 HttpExceptionFilter 方法中就能使用 AppService 这个注入的服务。