中间件
AOP
AOP(Aspect Oriented Programming) 面向切面编程,是一种编程范式。
当你的程序编写好了,现在发现要针对所有新增操作添加一个日志、权限的需求。一般的做法是,就是去改造每个接口方法,但这样就会和业务混淆,不利于维护,新增的需求与业务代码强耦合。
AOP 的思想是引导我们从另外一个方面思考,允许你以一种统一的方式在代码运行时,在想要的切入点插入这些逻辑。
洋葱模型
Nest 的中间件采用了与 Koa 中间件同样的**洋葱模型**,其思想与 AOP 的概念高度相符合。
Koa的next函数用于将控制权传递给下一个中间件函数,这个过程就像AOP的通知链。- 洋葱模型的前置执行和后置执行代码,类似于
AOP的环绕通知。 Koa没有显式的使用AOP来描述洋葱模型,但是可以不严谨的说,洋葱模型 = AOP
Nest 中间件与 管道、异常过滤器、拦截器、守卫 都基于 AOP 思想实现的,它们的区别在于作用不同、执行顺序 不同。
管道
(pipe):是一种将数据在一系列处理步骤中传递的机制,将多个函数或操作串联在一起,以便顺序地处理输入数据。中间件
(middleware):进入控制器之前被调用,可以使用requestObject,多个中间件按照定义顺序执行,使用next()方法执行下一个中间件。异常过滤器
(exceptionFilter):Nest会捕捉处理应用程序中所有未经处理的异常。拦截器
(interceptor):拦截器会在两个时机执行,一个是在进入控制器方法之前,一个是在离开控制器方法之后(最后的响应拦截)。守卫
(guard):根据运行时存在的某些条件(如权限、角色、TOKEN等)确定路由是否处理请求,常用于请求的权限校验。
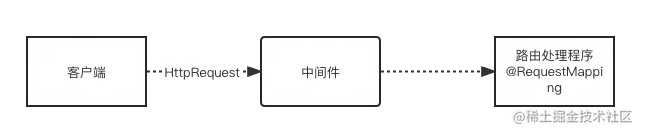
Nest 中间件
中间件 middleware 是一个函数,它在路由方法调用之前被调用。
中间件函数可以访问请求和响应对象,以及应用程序请求响应周期中的 next() 中间件函数。绑定多个中间件函数时,下一个中间件函数通常由一个名为 next 的变量表示。
Nest 的中间件默认情况下的表现和 Express 相同的(除非你使用 fastify 作为底层适配器)。
中间件函数可以执行以下任务:
- 执行任何代码。
- 对请求和响应对象进行更改。
- 结束请求/响应循环。
- 调用堆栈中的下一个中间件函数。
如果当前中间件函数没有结束请求/响应循环,那么它必须调用 next(),以将控制权传递给下一个中间件函数。否则,请求将保持挂起状态。
Nest 的中间件可以是函数还可以是使用 @Injectable() 装饰的类,它是类时必须实现 NestMiddleware 接口,函数则没有特殊要求。
使用中间件
首先我们定义 class ,实现简单的中间件功能。
// logger.middleware.ts
import { NestMiddleware } from '@nestjs/common'
import { Request, Response, NextFunction } from 'express'

export class LoggerMiddleware implements NestMiddleware {
  use(req: Request, res: Response, next: NextFunction) {
    console.log('Request...')

    next()
  }
}在 @Module() 装饰器中没有中间件的位置,绑定装饰器要额外使用 configure() ,该方法需要 module 实现 NestModule 接口。
// app.module.ts
// 局部模块绑定
import { MiddlewareConsumer, Module, NestModule } from '@nestjs/common'
import { AppController } from './app.controller'
import { AppService } from './app.service'
import { LoggerMiddleware } from './middlewares/logger.middleware'

@Module({
  imports: [],
  controllers: [AppController],
  providers: [AppService]
})
export class AppModule implements NestModule {
  configure(consumer: MiddlewareConsumer) {
    consumer.apply(LoggerMiddleware).forRoutes('')
  }
}依赖注入
Nest 中间件支持依赖注入,它们能够注入同一模块的依赖。
同一模块:中间件注册绑定的同一个模块,比如上面的案例,appModule 和 LoggerMiddleware 就属于同一模块,它能使用 appModule 注入的所有依赖。
// logger.middleware.ts
export class LoggerMiddleware implements NestMiddleware {
  constructor(private readonly appService: AppService) {}
  use(req: Request, res: Response, next: NextFunction) {
    console.log("Request...");

    next();
  }
}路由通配符
中间件支持基于路由的模式,在绑定中间件时,调用的 forRoutes() 方法所传递的 options 参数,控制着请求应该进入哪个路由的中间件函数。
路径支持路由通配符,与控制器的路由通配符中表现一致。
比如,星号用作通配符,并将匹配字符的任意组合,而 RequestMethod 表示允许哪种请求方法通过:
forRoutes({ path: 'ab*cd', method: RequestMethod.ALL });函数中间件
对于只有独立功能,没有成员、没有方法、没有依赖项的中间件,我们更推荐将其定义为函数式中间件,这种中间件被称为功能中间件。比如 LoggerMiddleware 只有简单的打印功能。
将之前的例子改为函数式中间件:
import { Request, Response, NextFunction } from "express";
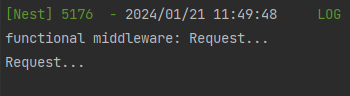
export function functionalLogger(req: Request, res: Response, next: NextFunction) {
console.log("functional middleware: Request...");
next();
}它们绑定的方式,与之前的并无不同:
// 局部模块绑定
@Module({
  imports: [],
  controllers: [AppController],
  providers: [AppService]
})
export class AppModule implements NestModule {
  configure(consumer: MiddlewareConsumer) {
    // consumer.apply(LoggerMiddleware).forRoutes("");
    consumer.apply(functionalLogger).forRoutes("");
  }
}

// 全局模块绑定
app.use(functionalLogger)绑定位置
中间件的绑定位置主要取决于它是模块级别还是全局级别
- 局部中间件:使用
configure()方法绑定,绑定的模块需要实现NestMiddleware接口,该方式可以同一模块注入的依赖。 - 全局中间件:使用
app.use(middlerware)的方式全局绑定中间件,该方式无法访问容器的依赖。还要额外注意!!这种方式只支持函数中间件。
// 局部绑定
@Module({
  imports: [],
  controllers: [AppController],
  providers: [AppService]
})
export class AppModule implements NestModule {
  configure(consumer: MiddlewareConsumer) {
    consumer.apply(LoggerMiddleware).forRoutes("");
  }
}

// 全局模块绑定
app.use(functionalLogger)中间件消费者
在使用 configure() 时,通过 apply 绑定注册中间件会返回一个MiddlewareConfigProxy 对象,使用对象内的方法会返回 消费者(生产者-消费者设计模式) MiddlewareConsumer ,并通过 forRoutes 指定路由。它们的包含关系如下:
MiddlewareConfigProxy:exclude、forRoutesMiddlewareConsumer:apply
configProxy 调用后会返回 consumer ,apply 后又会返回configProxy,这导致多个中间件可以通过链式调用串行链接。
forRouter() 可以绑定至少一个字符串、RouteInfo 对象、至少一个控制器类,大多数情况下多个参数以逗号隔开。下面是绑定单个中间件的案例:
@Module({
  imports: [],
  controllers: [AppController],
  providers: [AppService]
})
export class AppModule implements NestModule {
  configure(consumer: MiddlewareConsumer) {
    consumer.apply(LoggerMiddleware).forRoutes("*");
  }
}多个中间件
绑定多个中间件可以通过链式调用,也可以通过传递逗号分割的中间件列表到 apply 方法中。
// 传递多个中间件
consumer.apply(cors(), helmet(), logger).forRoutes(CatsController);

// 链式调用
consumer.apply(cors()).forRoutes(CatsController).apply(helmet()).forRoutes(CatsController).apply(logger).forRoutes(CatsController);访问 /cats ,绑定的两个中间件都会被触发。
路由排除
有时我们希望排除某些路由应用中间件。可以使用 exclude() 方法排除某些路由,该方法传递的参数与在 forRoutes 传递的一致。
consumer
  .apply(functionalLogger)
  .exclude("cats")
.forRoutes("*");该中间件将会排除 cats 路由。
中间件的定位略微尴尬,对于 Nest 的每个 aop 组件来说,功能太相似了,也就是中间件能做的事,其他组件也能做。
组件有各自的职责,对于中间件来说,它更适合处理通用的逻辑。
案例一:日志请求记录
日志记录最为最常见的后端服务基础功能,该案例将会使用 中间件 + 拦截器 + 异常过滤器 + log4js 日志记录插件 实现。
基本需求:
- 输出错误日志、请求日志写入到本地日志文件和控制台
- 替换
Nest内置的Logger模块 - 日志文件支持压缩、配置文件大小、配置日期格式
最终要实现的文件有:
log4j配置文件- 全局异常过滤器、
HTTP异常过滤器 - 日志中间件
- 请求拦截器
log4j配置
import type { Configuration } from "log4js";
import { resolve } from "path";

const baseLogPath = resolve(__dirname, "../../", "log");

export const log4jConfig: Configuration = {
  appenders: {
    console: {
      type: "console"
    },
    access: {
      type: "dateFile", // 写入文件,并按照日期分类
      filename: `${baseLogPath}/access/access.log`, // 日志文件名,会命名为:access.20200320.log
      alwaysIncludePattern: true, // 日志文件名是否包含pattern属性
      pattern: "yyyyMMdd",
      numBackups: 3,
      category: "http",
      keepFileExt: true // 是否保留文件后缀,保存文件名access.20200320.log而不是access.log.20200320
    },
    app: {
      type: "dateFile",
      filename: `${baseLogPath}/app-out/app.log`,
      alwaysIncludePattern: true,
      layout: {
        type: "pattern",
        pattern: '{"date":"%d","level":"%p","category":"%c","host":"%h","pid":"%z","data":\'%m\'}'
      },
      pattern: "yyyyMMdd",
      numBackups: 3,
      keepFileExt: true
    },
    errorFile: {
      type: "dateFile",
      filename: `${baseLogPath}/errors/error.log`,
      alwaysIncludePattern: true,
      layout: {
        type: "pattern",
        pattern: '{"date":"%d","level":"%p","category":"%c","host":"%h","pid":"%z","data":\'%m\'}'
      },
      pattern: "yyyyMMdd",
      numBackups: 3,
      keepFileExt: true
    },
    errors: {
      type: "logLevelFilter",
      level: "ERROR",
      appender: "errorFile"
    }
  },
  categories: {
    default: {
      appenders: ["console", "app", "errors"],
      level: "DEBUG"
    },
    info: { appenders: ["console", "app", "errors"], level: "info" },
    access: { appenders: ["console", "app", "errors"], level: "info" },
    http: { appenders: ["access"], level: "DEBUG" }
  },
  pm2: true, // 使用 pm2 来管理项目时,打开
  pm2InstanceVar: "INSTANCE_ID" // 会根据 pm2 分配的 id 进行区分,以免各进程在写日志时造成冲突
};

// 日志级别
export enum LoggerLevel {
  ALL = "ALL",
  MARK = "MARK",
  TRACE = "TRACE",
  DEBUG = "DEBUG",
  INFO = "INFO",
  WARN = "WARN",
  ERROR = "ERROR",
  FATAL = "FATAL",
  OFF = "OFF"
}中间件
中间件有两种使用方式:
- 封装通用的
Logger类,只要是JavaScript技术都能使用。 - 只限在
Nest中依赖注入使用,需要用到动态模块。
提供两种选择,在使用时二选一即可
封装通用 Logger 类:
// 通用 Logger 类
import * as Path from "path";
import * as Log4js from "log4js";
import * as Util from "util";
import * as Moment from "moment";
import * as StackTrace from "stacktrace-js"; // 捕获和处理 JavaScript 中的堆栈跟踪信息
import Chalk from "chalk"; // 用于 Node.js 和浏览器控制台输出的颜色库
import { log4jConfig, LoggerLevel } from "../config/log4j";

// 内容跟踪类
export class ContextTrace {
  constructor(
    public readonly context: string,
    public readonly path?: string,
    public readonly lineNumber?: number,
    public readonly columnNumber?: number
  ) {}
}

Log4js.addLayout("Awesome-nest", (logConfig: any) => {
  return (logEvent: Log4js.LoggingEvent): string => {
    let moduleName = "";
    let position = "";

    // 日志组装
    const messageList: string[] = [];
    logEvent.data.forEach((value: any) => {
      if (value instanceof ContextTrace) {
        moduleName = value.context;
        // 显示触发日志的坐标(行,列)
        if (value.lineNumber && value.columnNumber) {
          position = `${value.lineNumber}, ${value.columnNumber}`;
        }
        return;
      }

      if (typeof value !== "string") {
        value = Util.inspect(value, false, 3, true);
      }

      messageList.push(value);
    });

    // 日志组成部分
    const messageOutput: string = messageList.join(" ");
    const positionOutput: string = position ? ` [${position}]` : "";
    const typeOutput = `[${logConfig.type}] ${logEvent.pid.toString()}   - `;
    const dateOutput = `${Moment(logEvent.startTime).format("YYYY-MM-DD HH:mm:ss")}`;
    const moduleOutput: string = moduleName ? `[${moduleName}] ` : "[LoggerService] ";
    let levelOutput = `[${logEvent.level}] ${messageOutput}`;

    // 根据日志级别,用不同颜色区分
    switch (logEvent.level.toString()) {
      case LoggerLevel.DEBUG:
        levelOutput = Chalk.green(levelOutput);
        break;
      case LoggerLevel.INFO:
        levelOutput = Chalk.cyan(levelOutput);
        break;
      case LoggerLevel.WARN:
        levelOutput = Chalk.yellow(levelOutput);
        break;
      case LoggerLevel.ERROR:
        levelOutput = Chalk.red(levelOutput);
        break;
      case LoggerLevel.FATAL:
        levelOutput = Chalk.hex("#DD4C35")(levelOutput);
        break;
      default:
        levelOutput = Chalk.grey(levelOutput);
        break;
    }

    return `${Chalk.green(typeOutput)}${dateOutput}  ${Chalk.yellow(moduleOutput)}${levelOutput}${positionOutput}`;
  };
});

// 注入配置
Log4js.configure(log4jConfig);

// 实例化
const logger = Log4js.getLogger();
logger.level = LoggerLevel.TRACE;

export class Logger {
  static trace(...args) {
    logger.trace(Logger.getStackTrace(), ...args);
  }

  static debug(...args) {
    logger.debug(Logger.getStackTrace(), ...args);
  }

  static log(...args) {
    logger.info(Logger.getStackTrace(), ...args);
  }

  static info(...args) {
    logger.info(Logger.getStackTrace(), ...args);
  }

  static warn(...args) {
    logger.warn(Logger.getStackTrace(), ...args);
  }

  static warning(...args) {
    logger.warn(Logger.getStackTrace(), ...args);
  }

  static error(...args) {
    logger.error(Logger.getStackTrace(), ...args);
  }

  static fatal(...args) {
    logger.fatal(Logger.getStackTrace(), ...args);
  }

  static access(...args) {
    const loggerCustom = Log4js.getLogger("http");
    loggerCustom.info(Logger.getStackTrace(), ...args);
  }

  // 日志追踪,可以追溯到哪个文件、第几行第几列
  static getStackTrace(deep = 2): string {
    const stackList: StackTrace.StackFrame[] = StackTrace.getSync();
    const stackInfo: StackTrace.StackFrame = stackList[deep];

    const lineNumber: number = stackInfo.lineNumber;
    const columnNumber: number = stackInfo.columnNumber;
    const fileName: string = stackInfo.fileName;
    const basename: string = Path.basename(fileName);
    return `${basename}(line: ${lineNumber}, column: ${columnNumber}): \n`;
  }
}动态模块,依赖注入日志:
TODO: 参考https://github.com/quickts/nestjs-log4js
// Logger 动态模块// Logger 服务// Logger 服务常量异常过滤器
要定义两个异常过滤,一个是捕获全局异常,另一个是用来捕获 HTTP 异常
// 全局异常过滤器// HTTP异常过滤器拦截器
// 拦截用户请求,写入每次请求信息使用日志
// 在 main.ts 中使用日志模块,提供两种方式:通用logger,依赖注入案例二:处理xml格式的请求转换为JSON
TODO:使用 xml2js 库,将xml数据转成js对象
https://blog.csdn.net/lxy869718069/article/details/103960790